-40%
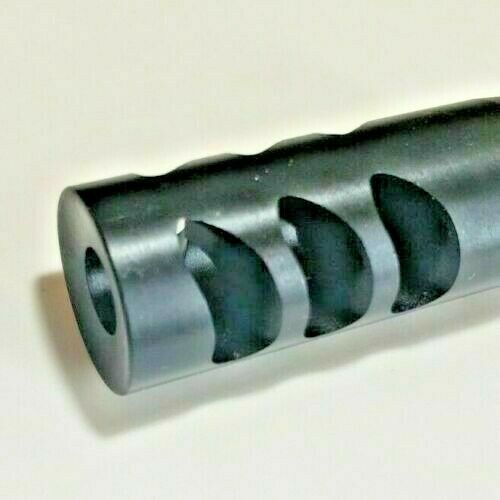
DELTAC® "Backfire" muzzle brake for Mosin Nagant - Complete threading kit
$ 52.79
- Description
- Size Guide
Description
Very effective break for your Mosin Nagant rifleReduce muzzle rise and recoil
Backfire Muzzle Brake +
M15X1RHRH
die + Thread alignment tool
+ Heavy Duty #5 Die Handle
We believe that threading the barrel of your rifle is the most effective method to install a muzzle break. Threading your barrel with the use of the enclosed threading tool insure your thread are true and are permanent but ensure reliability and accuracy. We also suggest this to be done by a gunsmith.
Muzzle Brake
Length: 2.520 inches
CALIBER: 7.62
Exit hole .340 inches
Thread:
M15X1RH
threads.
Machined from top quality steel and finished in black oxide. Counts as 1 US922r compliant part.
Die
HSS Round die adjustable
M15X1RH
Thread alignment tool:
This is a simple TAT (thread alignment tool) for 7.62 caliber muzzles to accept the above
M15X1RH
muzzle device.
It helps you get the die started level and on-center to prevent costly mistakes.
Material: 303 Stainless Steel
#5 Die Handle
This a heavy duty #5 die handle is approx. 10.75in long and accepts
1.5in dia (38mm) dies.
The handle ends are removable. These are high quality handles made of high tensile steel.
PKG Content
:
1 Threaded Slingshot muzzle break
1 HSS
M15X1RH adjustable
round Die
1 Stainless Steel Thread alignment tool with a 3" long stem
#5 die handle
1 Jam nut
Muzzle Threading
Instructions
Skill Level: Advanced
Please consider your skills before attempting to modify a firearm. Although this is a DIY kit advanced skills are required beyond the written instructions. Modifying a firearm without the proper skills are dangerous to both you and others.
Instructions:
Screw the TAT about 4-5 threads into the back of the die with the pilot
sticking out in front.
Insert die and TAT into handle, preferably lettered towards you and aligning
at least one of the tightening screws in the handle with the divots in the die
OD.
Secure the barrel vertically in a padded vise
Apply a good cutting fluid/oil to the die teeth and start cutting. It will take a
little bit of vertical downward pressure to get started. Apply even downward
pressure and rotate the die slowly.
Repeatedly advance the die about 1/8 turn, then back it off to break up the
shaving (chips).
Do not allow the face of the TAT to ever reach the barrel face. This could
strip the teeth out, possibly damaging the TAT and ruining the few threads
that you have cut on the
barrel.
Once you’ve cut about 4-5 threads, and before the TAT reaches the barrel
face, unscrew the die completely, loosen the 2 tightening screws on the die
holder, and remove the TAT.
With the TAT removed, put the die back in the handle and hand tighten the 2
tightening screws.
Resume threading as above, breaking the chips and applying cutting fluid as
you go.
Thread to the desired depth, blow off the threads and check the fit with
whatever muzzle device you plan to use. You want the threads firm but able
to screw on by hand.
If your threads are too large, tighten the 2 screws in the handle a little bit,
apply more cutting fluid and run over the threads again. Blow off the threads
and check the fit again. Repeat as needed.
If necessary, you can take the die out of the handle, unscrew the preset screw
in the die itself, and place back in handle, tightening the 2 screws for an even
smaller thread.
Hopefully this information will help you successfully complete your barrel
threading project. Make sure to wear protective glasses throughout the
process and Take Your Time! This type of work can be very rewarding
when all goes smooth, or a disastrous, aggravating, mess if you try to rush.


